Creating a DIY 433 MHz ESP8266-based Home Automation bridge to switch DIP remote control outlets

A couple of years ago I built a pretty basic smart home application allowing me to control my remote controlled sockets via an Android app or a Web Extension. It’s based on the rcswitch library run on an Apache. The 433 MHz signals are sent by a FS1000A transmitter hooked up via GPIO to a Raspberry Pi. The whole setup lied on the ground in a corner of my apartment behind a curtain next to my network wall jack. Now where we have just moved to a nice new and twice as big home, I needed a solution which could be placed in the middle of all rooms to allow the rather weak 433 MHz signals to reach every receiver. Additionally, I wanted to get rid of having to maintain a full Ubuntu server, which only serves as a light switch for the most part.

Firefox WebExtension used to turn on desk lamp

Around that time, I stumbled upon the ESP8266: a low-cost WiFi microchip with full TCP/IP stack and microcontroller capability – ideally soldered on a NodeMCU or Wemos D1 for the maximum level of convenience. Arduino and Wifi: a whole new world of IoT-possibilities. Once you’ve added the board manager to your Arduino IDE, you can use those tiny boards just like an ordinary Arduino. As the Arduino WebServer library can turn a NodeMCU development board into a light-weight HTTP server and the rcswitch library is also available on Arduino, I decided to put both – NodeMCU and FS1000A – into a junction box to create a DIY 433 MHz RF WiFi bridge.

To reach the bridge you should either assign a static IP or use mDNS. Keep in mind that mDNS is not supported by all operating systems out of the box. If in doubt, use a static IP.  To make the bridge accessible from outside your home network, you need to open and forward a port on your router (port 80 by default and can be changed in line 10). It’s recommend to secure any connection made through the public internet. By the time I was writing the script, there hasn’t been a HTTPS server implementation around. However, I found HelloServerBearSSL while writing this article. It looks very promising and is definitely worth a try.
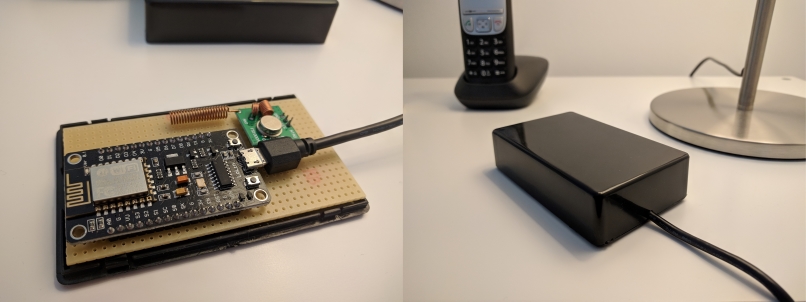
433Mhz RF WiFi Bridge Junction Box opened and closed
433 MHz RF WiFi Bridge Junction Box opened and closed

This project works with simple DIP-switch remote outlets only. It became quite hard to get the “old” DIP outlets as most producers switched to the “new” outlets, which use a button on the receivers to “learn” a signal. There is a NewRemoteSwitch library to deal with them. But as I just recently found one last triple pack in a dollar store, I am stocked until I will eventually move to Wifi controlled outlets.

Enough talk. A typical request contains the five digit system code, five digit unit code and a binary power code separated by comma. You can also concatenate multiple commands using semicolon. A sample request to switch on outlet A and switch off outlet B would look like this:

x.x.x.x/switch?command=10010,00001,1;10010,0010,0

Here is the code. Further down is a download link.

#include <ESP8266mDNS.h>
#include <ESP8266WebServer.h>
#include <ESP8266WiFi.h>
#include <RCSwitch.h>
#include <WiFiClient.h>

const char* ssid = "SSID";
const char* password = "PASSWORD";

ESP8266WebServer server(80);
RCSwitch rcswitch = RCSwitch();


void setup(void) {

  Serial.begin(115200);

  digitalWrite(2, HIGH); // Turn onboard led off
  rcswitch.enableTransmit(15);

  WiFi.mode(WIFI_STA); //  (WIFI_AP) will spawn an access point. useful when no router is present.
  WiFi.begin(ssid, password);

  Serial.println("");

  if (WiFi.waitForConnectResult() != WL_CONNECTED) {

    Serial.println("Wifi connect failed! Rebooting...");
    delay(5000);
    ESP.restart();
  }

  MDNS.begin("bridge"); // will make the bridge available under bridge.local

  Serial.println("");
  Serial.print("Connected to ");
  Serial.println(ssid);
  Serial.print("IP address: ");
  Serial.println(WiFi.localIP());

  server.on("/switch", handleSwitchRequest); //Associate the handler function to the path

  server.begin();
  Serial.println("HTTP server started");
}


int countCharacterOccurrence(char *haystack, char needle) {

  int count = 0;

  for (int i = 0; i < strlen(haystack); i++)

    if (haystack[i] == needle) {

      count++;
    }

  return count;
}


void handleSwitchRequest() {

  bool isBadRequest = false;
  String response = "";

  if (server.arg("command") != "") {

    char commands[1024]; // make some room to get the string server args
    server.arg("command").toCharArray(commands, sizeof(commands)); // convert string to char array

    char *pointerCommands = commands; // create a pointer and store commands at its memory's address
    char *commandToken;
    char *subCommandToken; 

    while ((commandToken = strsep(&pointerCommands, ";")) != NULL) { // delimiter is the semicolon. we are using the address of the pointer to the input string. strsep expects the address (pointer) of a pointer to the string that should be separated. if found, pointerCommands is updated to point past the delimiter. returns a pointer to the result token.

      int counter = 0;
      char* commandArray[3];

      if (countCharacterOccurrence(commandToken, ',') != 2) {

        isBadRequest = true;
        response += "ERROR:\t" + String(commandToken) + " - Bad format. Expected: ?command=10000,10000,1;\n";
        continue;
      }

      while ((subCommandToken = strsep(&commandToken, ",")) != NULL) { // delimiter is the comma

        commandArray[counter++] = subCommandToken;
      }

      if (strcmp(commandArray[2], "1") == 0) {

        rcswitch.switchOn(commandArray[0], commandArray[1]);
        response += "ON:\t" + String(commandArray[0]) + "," + String(commandArray[1]) + "," + String(commandArray[2]) + "\n";

      } else if (strcmp(commandArray[2], "0") == 0) {

        rcswitch.switchOff(commandArray[0], commandArray[1]);
        response += "OFF:\t" + String(commandArray[0]) + "," + String(commandArray[1]) + "," + String(commandArray[2]) + "\n";

      } else {

        isBadRequest = true;
        response += "ERROR:\t" + String(commandArray[0]) + "," + String(commandArray[1]) + "," + String(commandArray[2]) + " - Power must be either 1 or 0.\n";
      }

      delay(50); // will otherwise hick up and fatal
    }
  }

  server.send(isBadRequest ? 400 : 200, "text / plain", response);
}


void loop(void) {

  server.handleClient();
}

DOWNLOAD: 433MHzWifiBridge Project
 

Generating random alphanumeric profanity free codes using pthreads in PHP

A friend of mine recently forwarded me an offer he received for the generation of 50 million random codes: alphanumeric, 10 characters long, unique and not containing any profane words. Price tag: same as a brand new mid-range car. Lol. Hold my beer, I’ll do this. 🙂

Not too long after writing the first line, the SQLite table filled with codes in a breeze…. until I cranked up the profanity check from a couple of test badwords to a real world scenario list of around 2500 finest German swear words. It absolutely killed the performance, while the CPU utilization did not even hit the 30% mark. Being to lazy to rewrite everything in e. g. Java, I started to take a look at ways to bring multi-threading to PHP. This led me to pthreads, a project providing multi-threading based on Posix Threads. Motivation follows action, action follows laziness and voilà: the code generator is now able to utilize all available processing power. Combined with a few tweaks of the bad word dictionary, it dramatically reduced the time needed to finish the job. A test run on my old i7 4something took two and a half hours (using this English profanity list and requiring a minimum Shannon entropy of theoretically 2.2 bits per character).

The whole project and its output can be downloaded below. Make sure to install pthreads first. The script configuration is done in the Config.php. Also note that pthreads projects can be run via CLI only.

A couple of learnings made:

* Use a multi-threading language in the first place when thinking about solving highly repetitive tasks.
* Use random_int() instead of rand(). Using rand() will quickly lead you to duplicate codes as it does not generate cryptographically secure values.
* Create objects, that need to be passed into a pthreads worker, in the calling context and keep a reference. Objects created in a thread scope constructor will be destroyed to avoid memory issues.
* Combining multiple SQL INSERTs to one transaction will take way less time than inserting one by one.
* Having an idea about the statistical probability of hitting a duplicate code or unwanted word, helps balancing out the efforts taken to avoid them. Keep in mind that every constraint will make it easier to guess a code.

DOWNLOAD: CodeGenerator Project
DOWNLOAD: 50 mio codes (1.1 GB, zipped)

The easiest way to send basic HTTP POST or GET requests using PHP

The easiest way to send basic HTTP POST or GET requests is using PHP’s built in file_get_contents() function in conjunction with HTTP context options:

$data = http_build_query(
    array(
        'firstKey' => 'firstValue',
        'secondKey' => 'secondValue',
        'thirdKey' => 'thirdValue'
    )
);

$options = array('http' =>
    array(
        'method'  => 'POST',
        'header'  => 'Content-type: application/x-www-form-urlencoded',
        'content' => $data
    )
);

$context = stream_context_create($options);

$result = file_get_contents('https://httpbin.org/post', false, $context);

Further reading:

file_get_contents
HTTP context options

Using a ML8511 UV sensor and an Arduino Nano to test UV-filtering properties of sunglasses

Do cheap freebie sunglasses really block UV light or are they mostly just toys, which pose a serious health risk to your eyes? That’s the question I asked myself when coming across one of my wife’s cheesy glasses. I always warned her, but never could proof the potential risk of increased UV exposure caused by non-blocking tinted glasses. Until now…

After buying one of those cheap Arduino Nano clones (oh the irony), I started experimenting with all kind of sensors. One of them was the ML8511. This sensor detects 280 – 390 nm light most effectively. This wavelength is categorized as part of the UVB spectrum and most of the UVA spectrum. Overexposure to UVA radiation has been linked to the development of certain types of cataracts, and research suggests UVA rays may play a role in development of macular degeneration.

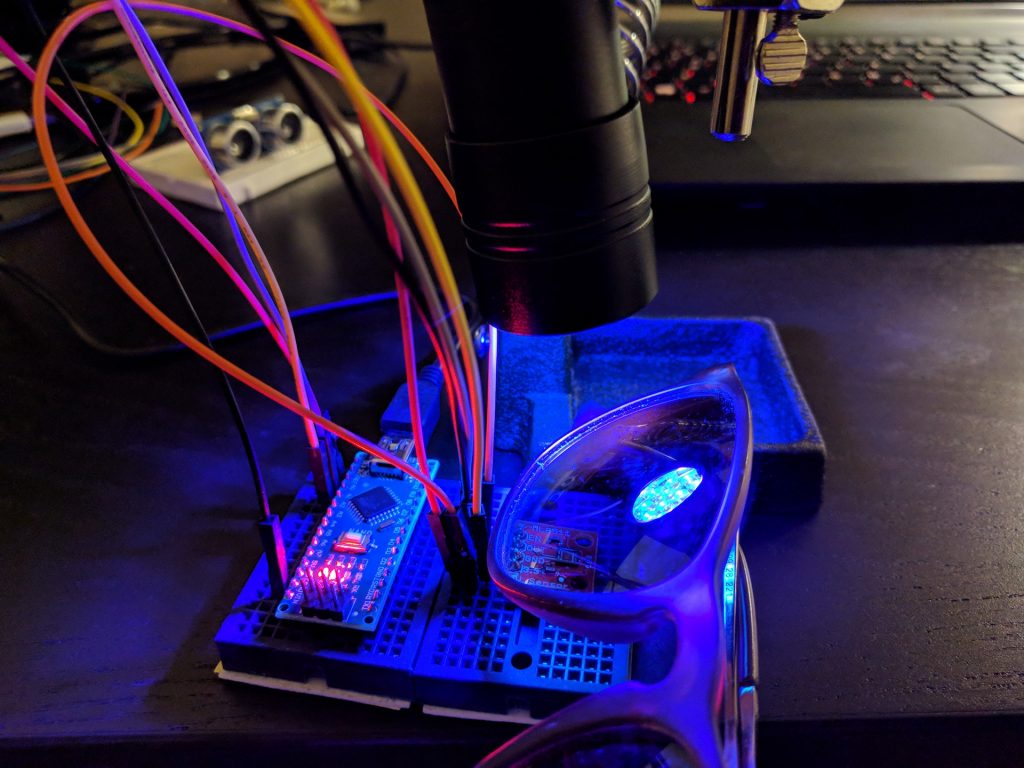
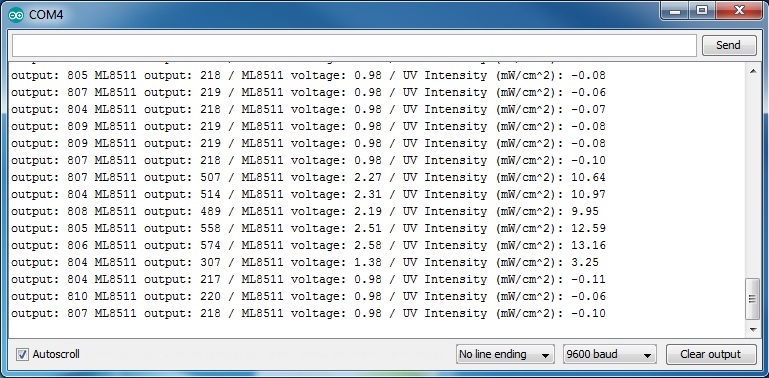
The setup was straight forward: I hung an UV LED torch over the sensor using my helping hand. The emitted 395 nm light is slightly out of range, but the torch has proven to be a reliable source of detectable UV light. Pointing the beam directly at the photo resistor was crucial as the amount of measurable UV light decreases rapidly on the beam’s edges. I used a sketch from Sparkfun to read the sensor’s output. The unit measure wasn’t really necessary as I was mainly interested in the relative amount of absorbed UV light. But having the Milliwatts per square Centimeter came in handy. The problem was that the script outputted -1 mW/cm² when being in an UV-free environment. The solution was unexpected: The voltage of the “supposed to be 1% accurate” 3v3 Nano output was in fact only 10% accurate and came out as being 3.61 volts. Seems like testing cheap sunglasses using even cheaper tools isn’t the best idea. However, the sketch’s output can be calibrated by adjusting the hard-coded reference variable in the script to the actual reference voltage.

All tested sunglasses absorbed a fair amount of UV light. The best pairs filtered the UV light nearly completely (meaning below a level that can be detected by an ML8511 in this particular setup and ignoring the minor UV halo around the frame due to the sensor not being fully covered by the glass). The rest ranged between letting 1 – 10% of UV irradiation to pass through – proving that all sunglasses had UV-filtering properties. Given that a good UV protection can be bought for less than 10 Euros (the best pair tested), it is probably a good idea to not use freebie sunglasses if you have a bad gut feeling. As general advice, make sure that you buy your glasses from trusted retailers (optician, pharmacy, supermarket, etc.) or let them be tested.

Seeing is believing. 😉


UV test setup with ML8511 and Arduino Nano R3
Serial monitor output of the sketch used


 /* 
 ML8511 UV Sensor Read Example
 By: Nathan Seidle
 SparkFun Electronics
 Date: January 15th, 2014
 License: This code is public domain but you buy me a beer if you use this and we meet someday (Beerware license).

 The ML8511 UV Sensor outputs an analog signal in relation to the amount of UV light it detects.

 Connect the following ML8511 breakout board to Arduino:
 3.3V = 3.3V
 OUT = A0
 GND = GND
 EN = 3.3V
 3.3V = A1
 These last two connections are a little different. Connect the EN pin on the breakout to 3.3V on the breakout.
 This will enable the output. Also connect the 3.3V pin of the breakout to Arduino pin 1.

 This example uses a neat trick. Analog to digital conversions rely completely on VCC. We assume
 this is 5V but if the board is powered from USB this may be as high as 5.25V or as low as 4.75V:
 http://en.wikipedia.org/wiki/USB#Power Because of this unknown window it makes the ADC fairly inaccurate
 in most cases. To fix this, we use the very accurate onboard 3.3V reference (accurate within 1%). So by doing an
 ADC on the 3.3V pin (A1) and then comparing this against the reading from the sensor we can extrapolate
 a true-to-life reading no matter what VIN is (as long as it's above 3.4V).

 Test your sensor by shining daylight or a UV LED: https://www.sparkfun.com/products/8662

 This sensor detects 280-390nm light most effectively. This is categorized as part of the UVB (burning rays)
 spectrum and most of the UVA (tanning rays) spectrum.

 There's lots of good UV radiation reading out there:
 http://www.ccohs.ca/oshanswers/phys_agents/ultravioletradiation.html
 https://www.iuva.org/uv-faqs

*/

//Hardware pin definitions
int UVOUT = A0; //Output from the sensor
int REF_3V3 = A1; //3.3V power on the Arduino board

void setup()
{
  Serial.begin(9600);

  pinMode(UVOUT, INPUT);
  pinMode(REF_3V3, INPUT);

  Serial.println("ML8511 example");
}

void loop()
{
  int uvLevel = averageAnalogRead(UVOUT);
  int refLevel = averageAnalogRead(REF_3V3);

  //Use the 3.3V power pin as a reference to get a very accurate output value from sensor
  float outputVoltage = 3.3 / refLevel * uvLevel;   // adjust outputVoltage to actual voltage in case you read negative values.

  float uvIntensity = mapfloat(outputVoltage, 0.99, 2.8, 0.0, 15.0); //Convert the voltage to a UV intensity level

  Serial.print("output: ");
  Serial.print(refLevel);

  Serial.print("ML8511 output: ");
  Serial.print(uvLevel);

  Serial.print(" / ML8511 voltage: ");
  Serial.print(outputVoltage);

  Serial.print(" / UV Intensity (mW/cm^2): ");
  Serial.print(uvIntensity);

  Serial.println();

  delay(100);
}

//Takes an average of readings on a given pin
//Returns the average
int averageAnalogRead(int pinToRead)
{
  byte numberOfReadings = 8;
  unsigned int runningValue = 0; 

  for(int x = 0 ; x < numberOfReadings ; x++)
    runningValue += analogRead(pinToRead);
  runningValue /= numberOfReadings;

  return(runningValue);  
}

//The Arduino Map function but for floats
//From: http://forum.arduino.cc/index.php?topic=3922.0
float mapfloat(float x, float in_min, float in_max, float out_min, float out_max)
{
  return (x - in_min) * (out_max - out_min) / (in_max - in_min) + out_min;

}


Reference and further reading:

https://learn.sparkfun.com/tutorials/ml8511-uv-sensor-hookup-guide
https://en.wikipedia.org/wiki/Ultraviolet
http://www.canadianjournalofophthalmology.ca/article/S0008-4182(17)30495-7/fulltext

Stepscout: A tool to search for jobs and apartments at the same time

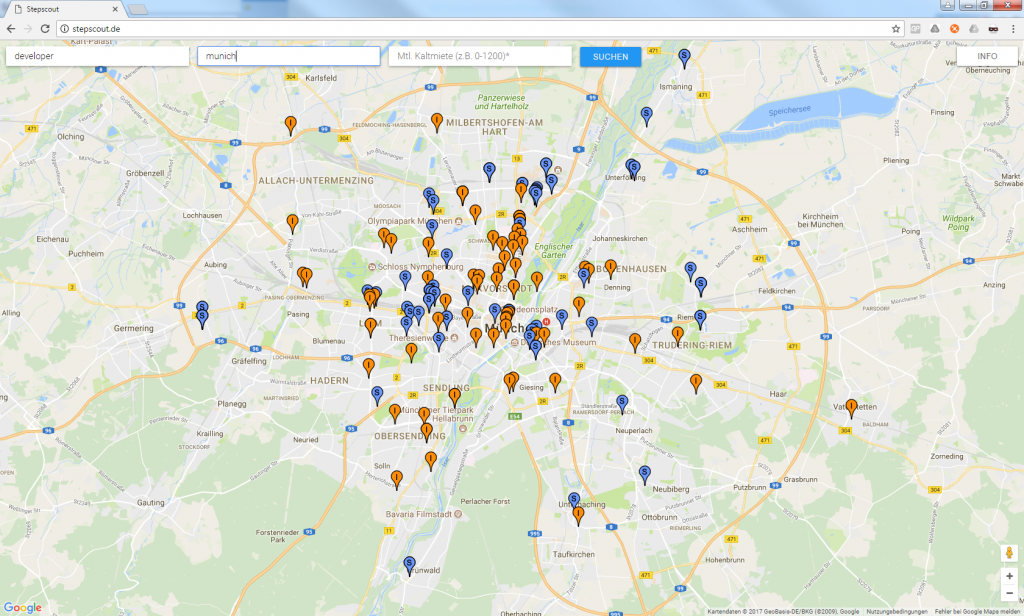
I think living near one’s workplace is a great benefit for a good work-live balance. If you are living in your current city for a while, you probably already know where the best places to live and work are. But if you are starting to search for one or the other, you might ask yourself which neighborhood is the best to reduce the daily commute to a minimum. To find answers to this question I build Stepscout. It leverages the Stepstone and ImmobilienScout24 API’s to find jobs & apartments in one go and marks them together on a Google Map. This visualization helps to find job clusters, apartment clusters or ideally job-apartment-clusters.

The trick in this project was to make use of Google’s Places API to search for latitude and longitude of every company in the Stepstone result response. Even though Stepstone’s response JSON contains fields for geographic coordinates, they are empty or filled with generic values for the most part.

If you are living in Germany, you can check out the tool here or get a first impression below.

Boilerplate for a basic PHP cURL POST or GET request with parameters on Apache

cURL is a library for transferring data using various protocols – in this case most importantly HTTP POST and GET. PHP installed on a Linux distribution or as part of XAMPP uses libcurl. If you haven’t enabled cURL yet, open your php.ini and remove the semicolon at the beginning of this line:

;extension=php_curl.dll
^--- remove this semicolon

You will find the location of your php.ini in the output’s first line when running

php --ini

on the command line or by using the XAMPP control panel on a Windows machine. Click the ‘Config’ button next to the Apache module and select ‘PHP (php.ini)’ from the context menu. Save the changes and restart Apache – either by pressing ‘Stop’ & ‘Start’ on the XAMPP control panel or by using the Linux command line:

sudo service apache2 restart

If cURL for PHP isn’t installed, run

sudo apt-get install php-curl

 prior to the step above.

You’ll find further information on how to use cURL here: http://php.net/manual/en/book.curl.php

This boilerplate wraps cURL in a simple function with four parameters: request type, url, parameters and headers. The first snippet contains comments for every step. The second snippet is exactly the same code but without any comments.

Commented boilerplate:

<?php
 
$url = 'http://httpbin.org/post';
 
$parameters = array(
      'firstKey' => 'firstValue',
      'secondKey' => 'secondValue',
      'thirdKey' => 'thirdValue'
);
 
$headers = array(
      'X-Custom: 123',
      'X-Api-Key: ABC123'
);
 
// fire the request. Access the response object with $response->success and $response->body
$response = request('POST', $url, $parameters, $headers);

     
/**
 * cURL a resource with parameters
 *
 * @param string $requestType The request type POST or GET  
 * @param string $url The request URL
 * @param array|null $parameters An array of request parameters
 * 
 * @return object Response object with $success (bool) and $body (string) property.
 */ 
function request($requestType, $url, $parameters = null, $headers = null){
 
      // instantiate the response object
      $response = new stdClass();

      // check if cURL is enabled
      if(!function_exists('curl_init')){

            $response->success = false;
            $response->body = 'cURL is not enabled.';

            return $response;
      }
 
      // instantiate a cURL instance and set the handle
      $ch = curl_init();
 
      // build http query if $parameters is not null. Parameters with null as value will be removed from query.
      ($parameters !== null) ? $query = http_build_query($parameters) : $query = '';
 
      // POST:
      if($requestType === 'POST'){
 
            // 1 tells libcurl to do a regular HTTP post and sets a "Content-Type: application/www-form-urlencoded" header by default
            curl_setopt($ch,CURLOPT_POST, 1);                
            // add the query as POST body
            curl_setopt($ch,CURLOPT_POSTFIELDS, $query);     
            
      // GET:
      }elseif ($requestType === 'GET') {
      
            // if not empty, add parameters to URL
            if($query) $url = $url . '?' . $query;                
               
      // ELSE: 
      }else{
 
            $response->success = false;
            $response->body = 'request type GET or POST is missing.';

            return $response;
      }
      
      // set the URL
      curl_setopt($ch, CURLOPT_URL, $url);                  
      // tell cURL to return the response body. A successful request will return true if not set.
      curl_setopt($ch, CURLOPT_RETURNTRANSFER, true);       
      // disable ssl certificate checks. Dirty, insecure workaround for common error "SSL Error: unable to get local issuer certificate". Fix it the correct way and remove the line!
      curl_setopt($ch, CURLOPT_SSL_VERIFYPEER, false);      
      // more options here: http://php.net/manual/en/function.curl-setopt.php
 
      // add headers if present
      if ($headers !== null) curl_setopt($ch, CURLOPT_HTTPHEADER, $headers);

      // execute and store the result
      $result = curl_exec($ch);                             
 
      // check if request was successful. If yes, return result. If not, return error and its code.
      if($result !== false){

            $response->success = true;
            $response->body = $result;

      }else{

            $response->success = false;
            $response->body = curl_error($ch);
            $response->error = curl_errno($ch);
      }                  
      
      // close session and delete handle
      curl_close($ch);                                      

      // return response object
      return $response;                                       
}


?>


And the raw template without comments:

<?php
 
$url = 'http://httpbin.org/post';
 
$parameters = array(
      'firstKey' => 'firstValue',
      'secondKey' => 'secondValue',
      'thirdKey' => 'thirdValue'
);
 
$headers = array(
      'X-Custom: 123',
      'X-Api-Key: ABC123'
);
 

$response = request('POST', $url, $parameters, $headers);


function request($requestType, $url, $parameters = null, $headers = null){
 
      $response = new stdClass();

      if(!function_exists('curl_init')){

            $response->success = false;
            $response->body = 'cURL is not enabled.';

            return $response;
      }
 
      $ch = curl_init();
 
      ($parameters !== null) ? $query = http_build_query($parameters) : $query = '';
 
      if($requestType === 'POST'){
 
            curl_setopt($ch,CURLOPT_POST, 1);                
            curl_setopt($ch,CURLOPT_POSTFIELDS, $query);  

      }elseif ($requestType === 'GET') {

            if($query) $url = $url . '?' . $query;

      }else{
 
            $response->success = false;
            $response->body = 'request type GET or POST is missing.';

            return $response;
      }
      
      curl_setopt($ch, CURLOPT_URL, $url);                  
      curl_setopt($ch, CURLOPT_RETURNTRANSFER, true);       
      curl_setopt($ch, CURLOPT_SSL_VERIFYPEER, false);      
 
      if ($headers !== null) curl_setopt($ch, CURLOPT_HTTPHEADER, $headers);

      $result = curl_exec($ch);                             

      if($result !== false){

            $response->success = true;
            $response->body = $result;

      }else{

            $response->success = false;
            $response->body = curl_error($ch);
            $response->error = curl_errno($ch);
      }                  
      
      curl_close($ch);                                      

      return $response;                                       
}


?>


Disable autoplay on Youtube’s new 2017 material design release

I happened to receive Youtube’s new 2017 desktop material design when I was watching videos the other day. All in all a great redesign which closes the gap to their other channels. You can force the new design by running the command below in your Firefox’s console’s command line (press [CMD] + [SHIFT] + [K]). Reload the page when done.

document.cookie="PREF=f6=4;path=/;domain=.youtube.com";

Unfortunately, the Firefox Greasemonkey script I used to disable Youtube’s autoplay feature does not work with their new site. Just removing the autoplay toggle’s node from the DOM does not do the trick anymore. My investigations brought to light that the f5 property of the PREF cookie is used to toggle the autoplay feature under the hood. f5=30000 is the default value to disable autoplay and f5=20000 the default to enable it. So I built a new Greasemonkey script which reads the existing PREF cookie, looks for the f5-property and sets it accordingly (or adds it if not present). At the same time all existing values are preserved. Additionally, the autonav_disable cookie is set. It was the first thing I found during my investigations which made me think “easy….”. Anyways, it turned out this cookie is not used to control autoplay. Not sure what it does, but I set it just to play safe. Finally a MutationObserver is used to wait for the autoplay toggle and remove it once it is loaded. DOMContentLoaded did not help as it seems like the node is added afterwards. To install the script, first get Greasemonkey for Firefox here . Once Greasemonkey is installed, click here to install the Userscript or paste the code below into your own script. Force reload Youtube by pressing [CMD] + [F5] after successfully installing the script.

// ==UserScript==
// @name        Disable Youtube Autoplay Material Design
// @namespace   https://kubath.com
// @include     *youtube.com/*
// @version     1
// @grant       none
// @run-at      document-start
// ==/UserScript==

/*
 * This script disables Youtube's autoplay feature on the new 2017 material design page. 
 * The new design is currently in test and will not be shown to every user. 
 * To enforce Youtube's new material design run the command below in the console and reload the page.
 * document.cookie="PREF=f6=4;path=/;domain=.youtube.com";
 * 
 * This script will also disable autoplay on Youtube's previous page (prior to 2017).
 *
 * Bonus: To hide the cookie consent header uncomment setCookieConsentHideCookie(); below.
*/


var cookieDomainValue = '.youtube.com';
var prefCookieKey = 'PREF';
var prefCookieAutoplayToggleKey = 'f5';
var prefCookieAutoplayToggleValueAutonavDisabled = 30000;


setAutonavDisabledCookie(); // set autonav_disable cookie
setAutonavDisabledPrefCookie(); // set autoplay pref cookie (f5 = 30000)
// setCookieConsentHideCookie(); // uncomment to hide cookie consent bar
removeAutonavElement(); // remove autoplay element


// get cookies
function getCookie(name) {
  var value = '; ' + document.cookie;
  var parts = value.split('; ' + name + '=');
  if (parts.length == 2) return parts.pop().split(';').shift();
}


// wait for the autoplay bar to appear and remove it
function removeAutonavElement() {
  var mutationObserver = new MutationObserver(function (mutations, mutationObserverInstance) {
    var element = document.getElementById('head');
   
    if (element) {
      element.remove();
      mutationObserverInstance.disconnect();
      return;
    }
  });
  
  mutationObserver.observe(document, {
    childList: true,
    subtree: true
  });
}


// set the autonav_disabled cookie (which appears sometimes but does not seem to have any effect)
function setAutonavDisabledCookie() {
 
  document.cookie = 'autonav_disabled=true; path=/; domain=' + cookieDomainValue;
}


// get the PREF cookie, search for the f5 key and set the required value to disable Youtube autoplay
function setAutonavDisabledPrefCookie() {
 
  var input = getCookie(prefCookieKey);
  var output = '';
  
  if (input && input.indexOf('=') !== -1) {
    var inputArray = input.split('&');
    var outputArray = {};

    var found = false;
    
    for (var i = 0; i < inputArray.length; i++) {
      
      var temp = inputArray[i].split('=');
      
      if(!temp[1]){
        
        temp[1] = '';
      }
      
      outputArray[temp[0]] = temp[1];
    }
    
    for (var key in outputArray) {
      
      if (key == prefCookieAutoplayToggleKey) {
        
        found = true;
        outputArray[key] = prefCookieAutoplayToggleValueAutonavDisabled;
      }
      
      if (output == '') {
        
        output = key + '=' + outputArray[key];
      } else {
        
        output = output + '&' + key + '=' + outputArray[key];
      }
    }
  }
  
  if (!found) {
    
    if(output == ''){
      
      output = 'f5=30000';
    }else{
      
      output = output + '&f5=30000';
    }
  }
  
  document.cookie = prefCookieKey + '=' + output + ';  path=/; domain=' + cookieDomainValue;
}


// bonus: set the "remind me later" cookie for the cookie consent bar
function setCookieConsentHideCookie(){
  
  document.cookie = 'HideTicker=true; path=/; domain=' + cookieDomainValue;
}

Bonus: To hide Youtube’s cookie consent bar, uncomment the first occurrence of setCookieConsentHideCookie(); in the script.